
Back from the market, DIY enthusiasts can find inspiration and practical solutions by making baskets, decorative baskets from recycled materials such as wooden boxes, wicker baskets, colorful fabrics, modular shelves to optimize the space… With a bit of creativity, each return from the market can become an opportunity to transform fresh produce into an aesthetic and functional display.
1. Patterned tea towels
Difficulty: easy / Time: 30 min per pattern / Cost: inexpensive
Material :
- Cotton tea towels and/or apron (Ikea and Sostrene Grene)
- Pébéo Setacolor textile paint in different colors
- Stencil Brushes
- Thick paper
- Tracing paper
- Wooden pencil
- Cutter
- Iron
1. Print vegetable silhouettes*. Reproduce them on thick paper, using tracing paper or draw them freehand on this paper. Using a cutter, cut out the inside of the stencils.
Trick : it is necessary to achieve at least 2 stencils per vegetablea first for the “body” and another with the details (leaves, peduncle…)
2. Position a stencil of your choice on a tea towel. Dip your brush in the paint, without adding too much, then tap, with a straight brush, inside the stencil. Remove the latter carefully and let dry.
3. Place the second stencil to create the details. Work like this for all the vegetables, letting the paint dry well between each step. Finish by ironing the patterns on the reverse side with a hot iron, without steam so that they do not come off in the wash.
*on the Internet : drawings.rapide.net/nature/legume
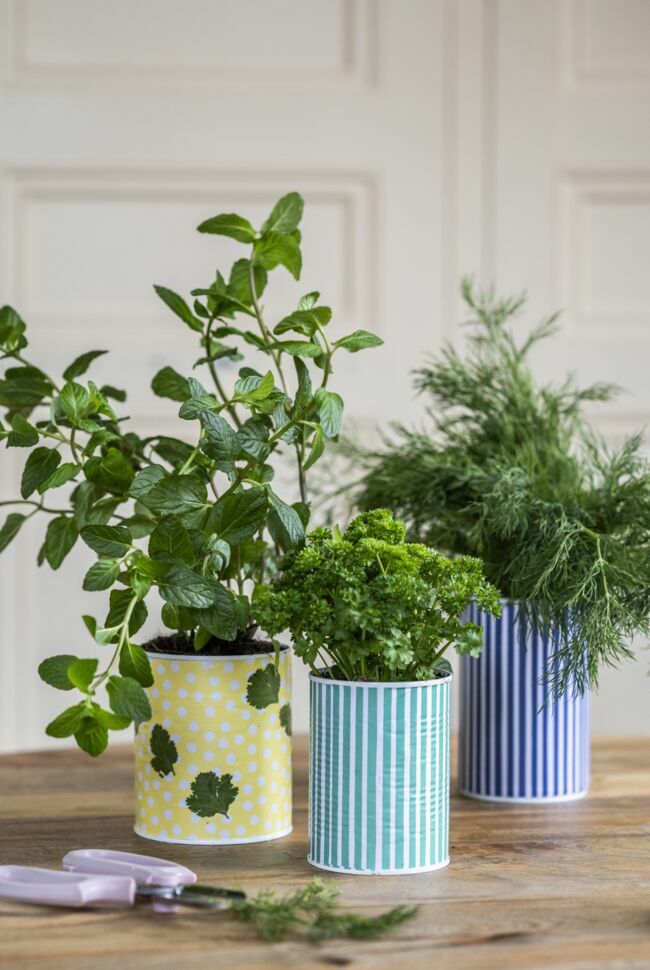
2. Aromatic pots
Wash cans, remove labels and file sharp edges. Paint the lower and upper edges in white. Let dry. Cut strips of decorative paper (here, Sostrene Grene) to the size of the boxes. Apply a layer of adhesive varnish all around the metal perimeter, position the paper. Apply glue varnish over it, let it dry. Decorate with dried leaves if necessary.
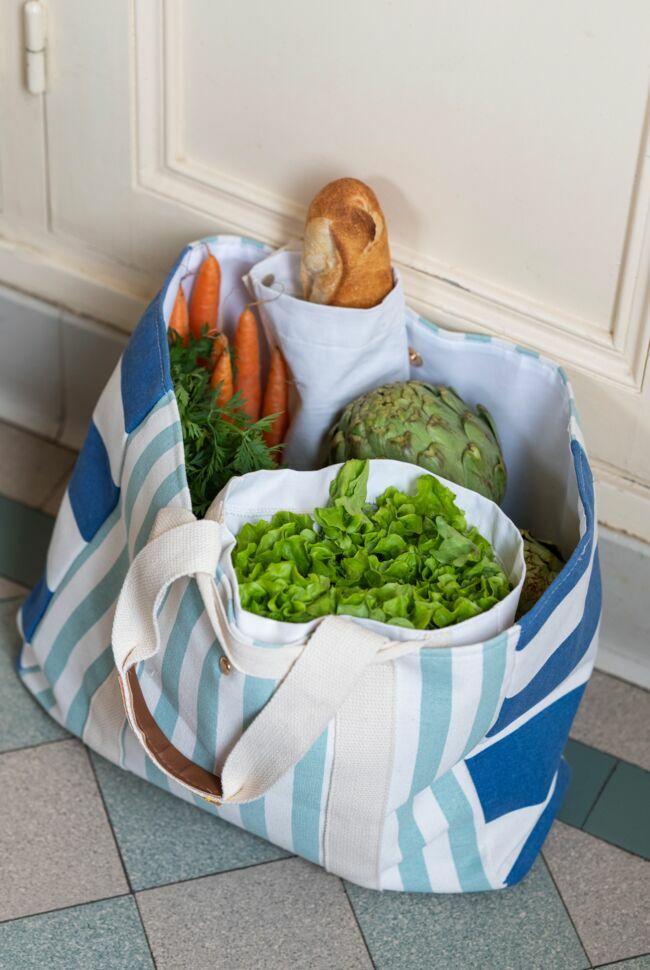
3. Shopping bag dividers
Difficulty: easy / Time: 1 hour for 2 bags / Cost: inexpensive
Material :
- For the large model: 1 coupon of 34 x 84 cm of cotton – or width between the 2 handles of the bag x (depth of the bag x2) Coordinated thread 34 cm of twill ribbon (or width between the 2 handles of the bag + 3.5 cm)
- For the small model: 16 x 84 cm of cotton – or width of the handle + 13 cm x (depth of the bag x2) Coordinated thread 20 cm of twill ribbon (or width of the bag obtained – 6 cm) 1 snap button (Prima Haberdashery)
1. For both models, fold the cotton vertically and sew the 2 sides to form the bag. Fold the top 1cm then 3cm. Sew this hem.
2. For the handle of the large model: fold each end of the twill tape by 1 cm then 2.5 cm. Pin it to the top hem of the bag, in the center. Sew each edge to the fold.
3. For the handle of the small model: fold each end of the twill tape by 1 cm then 2.5 cm. Sew one of these hems and secure the pressure on it. Place the ribbon on the top hem of the bag and sew the side of the ribbon left free. Attach the second part of the pressure to the bag.
Trick : create bags within the bag to protect the most fragile vegetables. Ideal for avoiding the mess in a large shopping bag.
4. Conservation charlottes
This is the best sustainable alternative to cling film or aluminum foil! You can buy these ready-made charlottes (Søstrene Grene) or make them yourself, with a piece of round coated canvas and an elastic band to sew around it, on the reverse side.

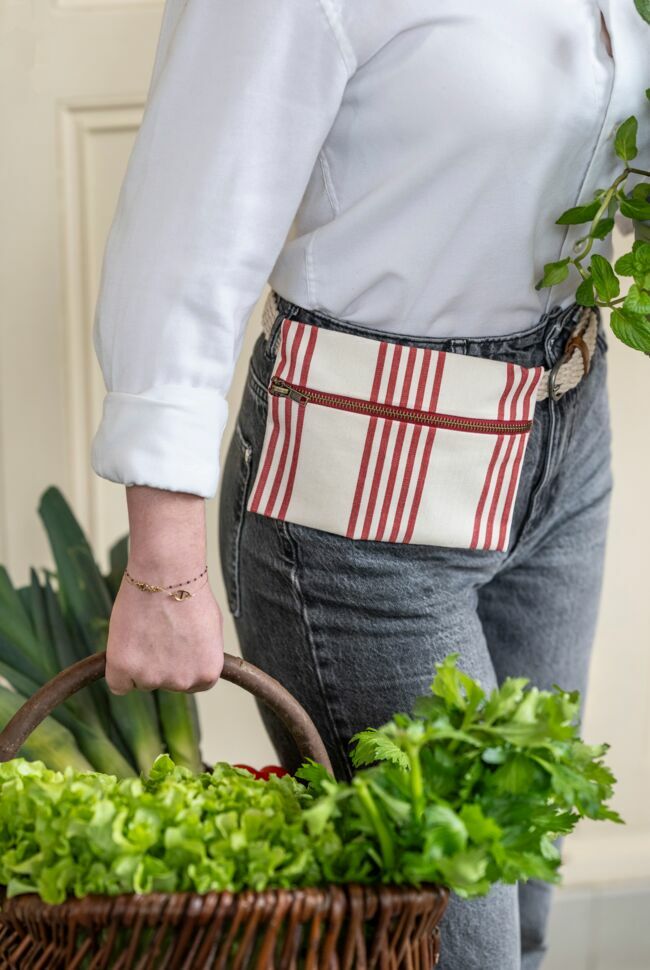
5. A belt pouch
Difficulty: easy / Time: 30 min / Cost: medium
Material :
- 2 coupons of 24 x 30 cm (for the pouch) and 21 x 8 cm (for the belt loop) of thick canvas
- 1 non-separable zipper of 22 cm (Mondial Tissus)
1. Prepare the loop: fold the short sides by 1 cm and sew. Fold the long sides by 1 cm and iron to mark these folds. Fold the pocket coupon 5 cm on the top and 10 cm on the bottom. Iron to mark the folds. Place the loop in the center of the back of the pouch and sew the two lengths 0.5 cm from the fold.
2. Sew the zipper to the two short sides of the pouch. Turn over to the wrong side, respecting the folds and sew the last sides (taking care when passing over the zipper) 1cm from the edges.
6. Bulk bags
Difficulty: easy / Time: 30 min / Cost: medium
Material :
- 1 coupon of 19 x 32 cm of honeycomb
- 1 coupon of 40 x 32 cm of tarlatan
- 80 cm of macramé string (Prima Mercerie)
- coordinating thread
- seam ripper
- safety pin
1. Assemble the tarlatan coupon and the honeycomb coupon on the two corresponding sides 0.75 cm from the edge. Place the resulting tube so that the tarlatan is centered. Sew on the wrong side of the bag, 0.75 cm from the edge.
2. Fold the top side of the bag to the wrong side, first by 1cm then by 1.5cm. Sew this hem. Carefully reopen the inside of the hem on one side with a quick seam ripper. Pass the macramé thread through the hem using the safety pin.

7. A clever vegetable dish
Difficulty: easy / Time: 2 hours / Cost: inexpensive
Material :
- 3 wooden crates (Knagglig, Ikea)
- 4 fixed castors Ø 40 mm) with fixing plate
- Slate paint
- Brush
- Masking tape
- Screwdriver
- 16 small wood screws
1. Assemble the 3 pine boxes following the instructions. Secure the 4 casters under one of them with the wood screws.
2. Remove a large top board from each crate, using a flathead screwdriver for leverage.
3. Position masking tape on the large middle board to leave a rectangle measuring 36 x 5 cm. Paint it with slate paint following the manufacturer’s recommendations (2 or 3 coats, spaced 6 hours apart).
4. Stack the crates with the one on wheels underneath. Write in chalk the origin or type of vegetables.

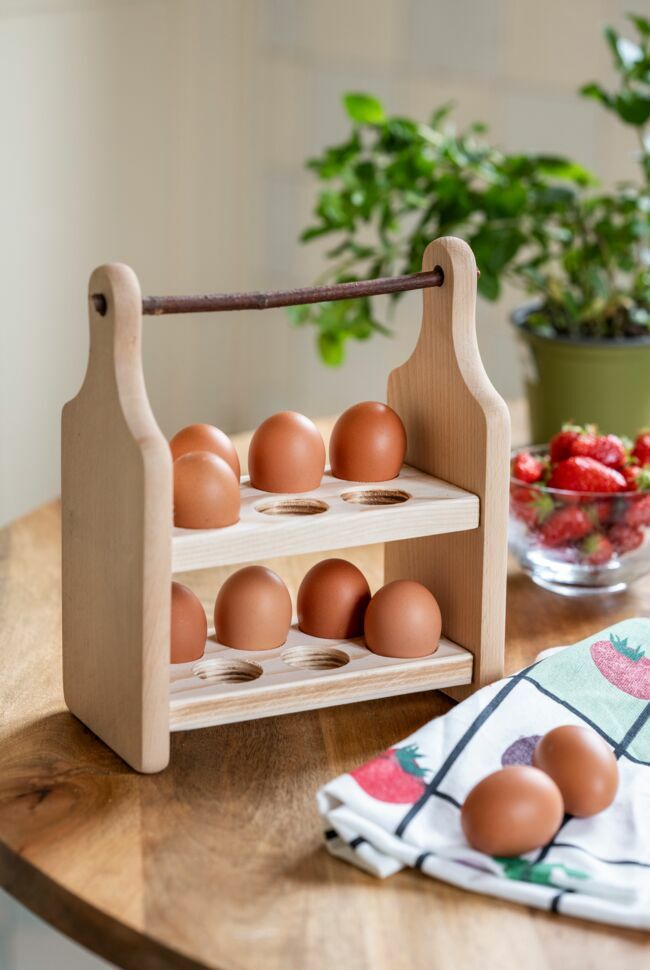
8. An original egg holder
Medium difficulty / Time 2 hours / Cost: inexpensive
Material :
2 small wooden cutting boards measuring L 11 x H 27 cm (Sostrene Grene)
1 wooden strip, 10 cm wide
A branch of hazel or chestnut tree (optional)
1 wood saw
1 hole saw with 38 mm tip
Sandpaper
Wood glue
Nails
Clamp
1. Cut 2 pieces of 19 cm in length from the strip. Make marks for the centers of the holes to be cut. Draw two lines parallel to the long edge, one at 3 and one at 7 cm. On the first line, draw a mark at 3.2 cm, 8.6 cm and 14 cm. On the second line, one at 5.6 cm, at 10.8 cm and at 16.2 cm.
2. Secure the marked cleat to a workbench using a clamp. Place the tip of the drill on one of the marks and drill with the hole saw tip. Do the same for the other 5 holes.
3. Repeat the operation on the second cleat. Lightly sand all edges and inside of holes.
4. On each cutting board, draw two horizontal marks, parallel to the short edge of the board at 2.5 and 11 cm.
5. Glue the 2 drilled strips by placing the lower edges on the markings on the cutting boards. Hold with a clamp during drying. Once dry, reinforce with small nails.
6. Cut a hazel or chestnut branch and slide it into the holes in the cutting boards to make a handle.
9. A special beginner’s pocket wallet
From a scrap of thick felt or leather, cut out a trapezoid with a base of 19 cm, a height of 8.5 cm and a top of 9.5 cm (i.e. 3 equilateral triangles with a side of 9.5 cm). Fold one triangle over the other, so as to obtain a diamond. Sew the sides facing the fold as close to the edge as possible. Drill a small hole at the tip of the triangle that remains free and pass a 6 cm elastic loop with a diameter of 1 mm through this hole. Tie the elastic inside the triangle.
