
Priced at 20 euros per month, Microsoft Copilot Pro integrates with Microsoft 365 to bring its AI capabilities to different applications in the suite. So Excel users can use Copilot Pro to convert data into a table, create formulas, analyze data, sort and filter information, generate charts, etc. Here’s how this approach works.
First, you need to sign up for a Microsoft 365 Personal or Family subscription. Priced at 70 euros per year, the Personal edition is designed for one person using up to five devices. Priced at 100 euros per year, the Family edition is designed for up to six people using up to five devices. The main applications in the suite are Word, Excel, PowerPoint, Outlook and OneNote.
Second, you will need to subscribe to Copilot Pro if you haven’t already. To register, go to the Copilot Pro website. Click the Get Copilot Pro button. Confirm subscription and payment. The Pro version will take effect the next time you use Copilot on the website, in Windows, or with mobile apps.
How to use Copilot Pro AI for Excel?
Third, to use Copilot in Excel, you must meet certain requirements. Your Excel files should be saved in .xlsx or .xslm format, while the data should be formatted as an Excel table (I’ll show you how to do it).
Additionally, you cannot work with local files; Your spreadsheets must be stored in OneDrive or Microsoft 365 SharePoint, and AutoSave must be enabled.
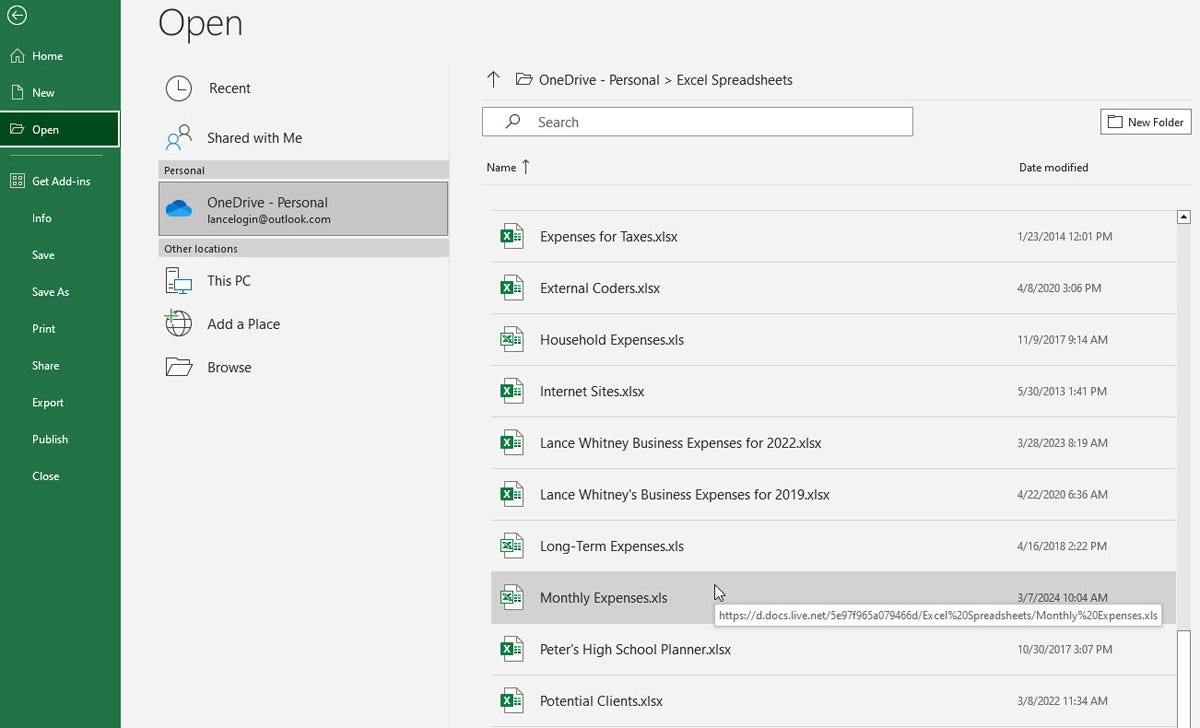
1. Launch Excel and open a spreadsheet
Launch Excel and open an existing spreadsheet containing data to analyze. To open a file stored online, click the File menu, select Open, then OneDrive or SharePoint. Browse the folders and files containing your spreadsheets and select the one you want to use.
You can also create or open a local file. To save it online, click the File menu, select Save As, then save it to a folder in OneDrive or SharePoint.
Screenshot by Lance Whitney/ZDNET
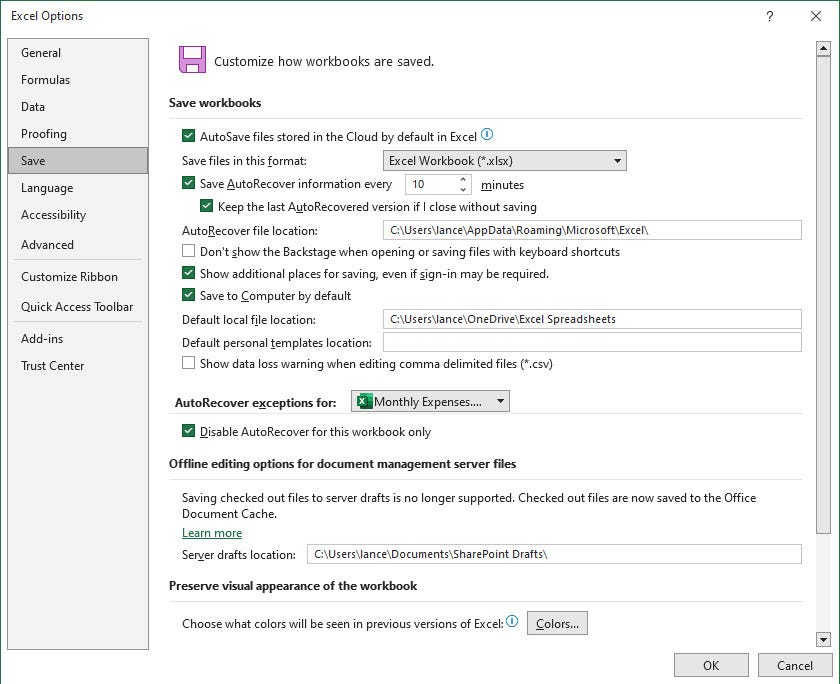
2. Enable AutoSave
Next, enable the AutoSave feature if it is not already enabled. Click the File menu and choose Options.
In the Options window, select Save, then check the box Auto-save files stored in the cloud by default in Excel. Make sure the file format is .xlsx if it’s a regular Excel spreadsheet. Click OK to close the Options window.
Screenshot by Lance Whitney/ZDNET
3. Convert data to table
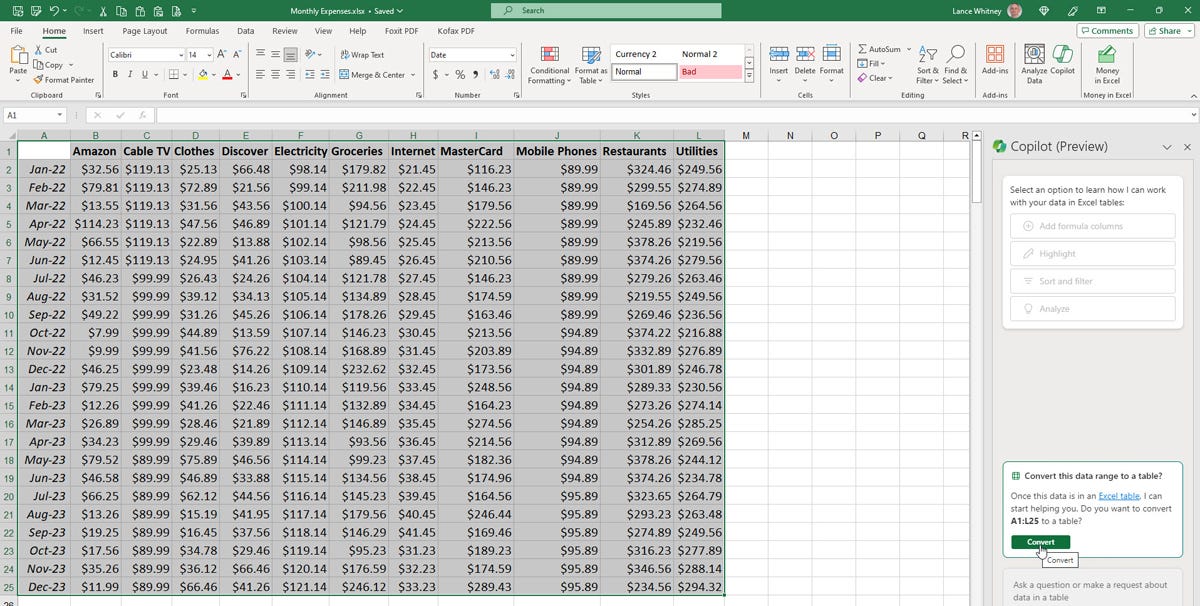
For Copilot to work with your data, you need to convert it into a table.
Select all the cells you want to include and click the Copilot button on the ribbon. A message may appear asking if you want to convert this data range to a table. Click the Convert button and the data will be formatted as a table with a header row at the top.
Screenshot by Lance Whitney/ZDNET
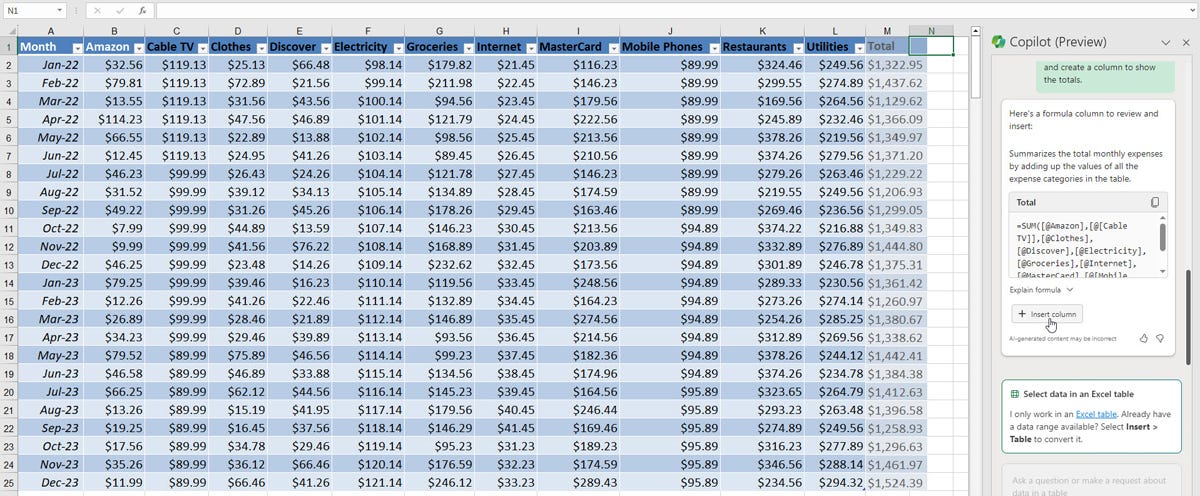
4. Add a formula column
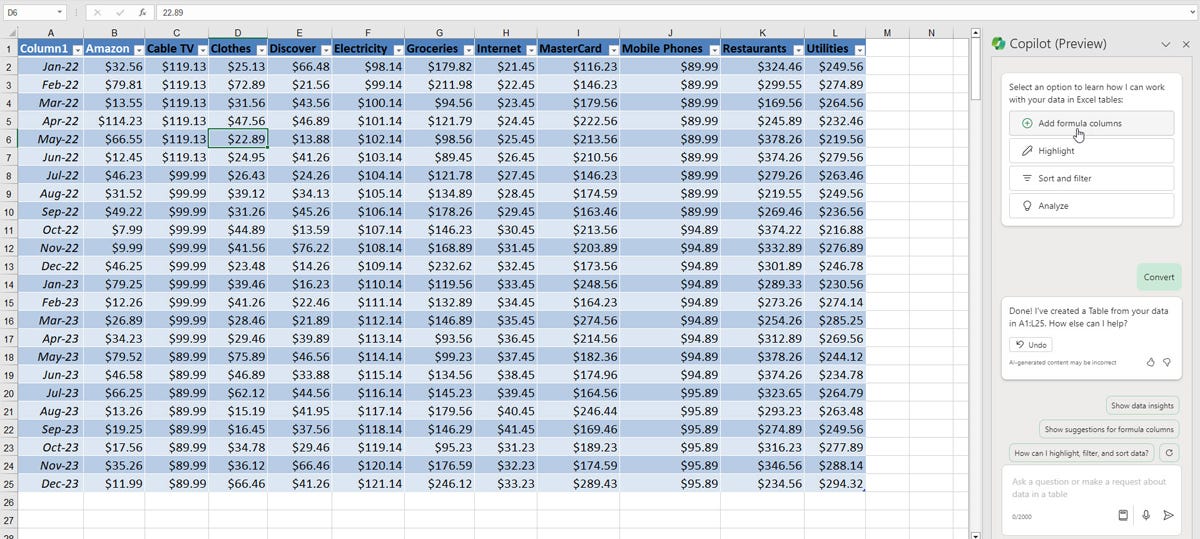
After converting the cells into a formatted table, Copilot displays its sidebar on the right and suggests several queries at the top.
Let’s say you have a table with numbers in each cell and you want to add a column to total the numbers in each row.
Select suggestion Add formula columns. When prompted, describe your request. For example, you could type “Add the numbers in each row and create a column to display the totals.”
Screenshot by Lance Whitney/ZDNET
In response, Copilot creates the formula. Review the formula to make sure it is correct.
If so, hover over the button Insert a column to preview the column, then click Insert a column to add it to the sheet:
Screenshot by Lance Whitney/ZDNET
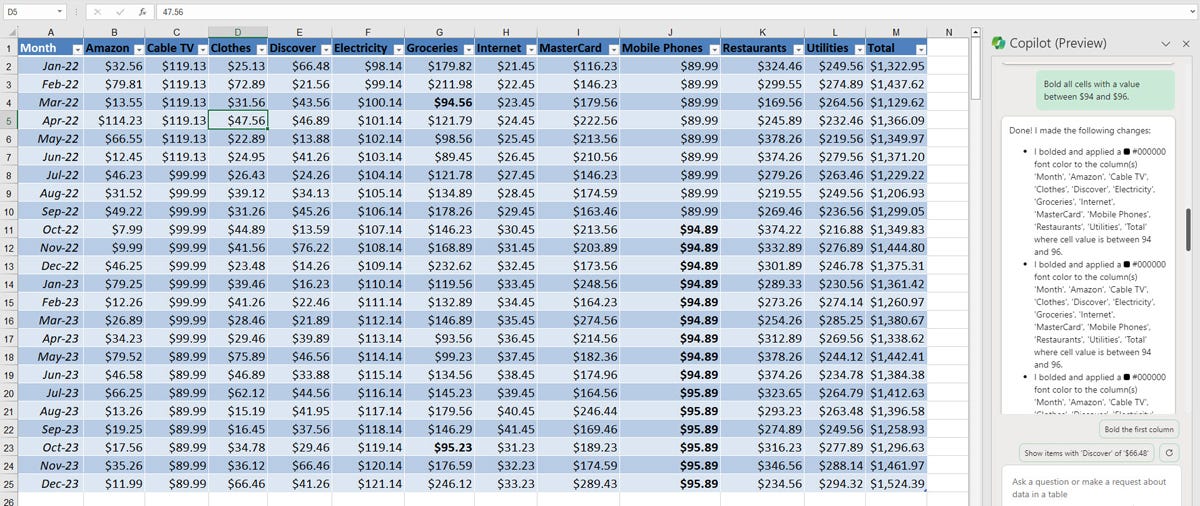
5. Format Cells
You can then apply a specific format to cells that meet certain criteria. Click the highlight suggestion.
Let’s say you want to bold all cells that contain a certain value. You can type “Bold all cells with a value between $94 and $96.” Enter this text when prompted, then submit your request.
Copilot executes your action by explaining to you what it did. If your request was executed successfully, great. Otherwise, you can click the Cancel button and try again. Formatting cells
Screenshot by Lance Whitney/ZDNET
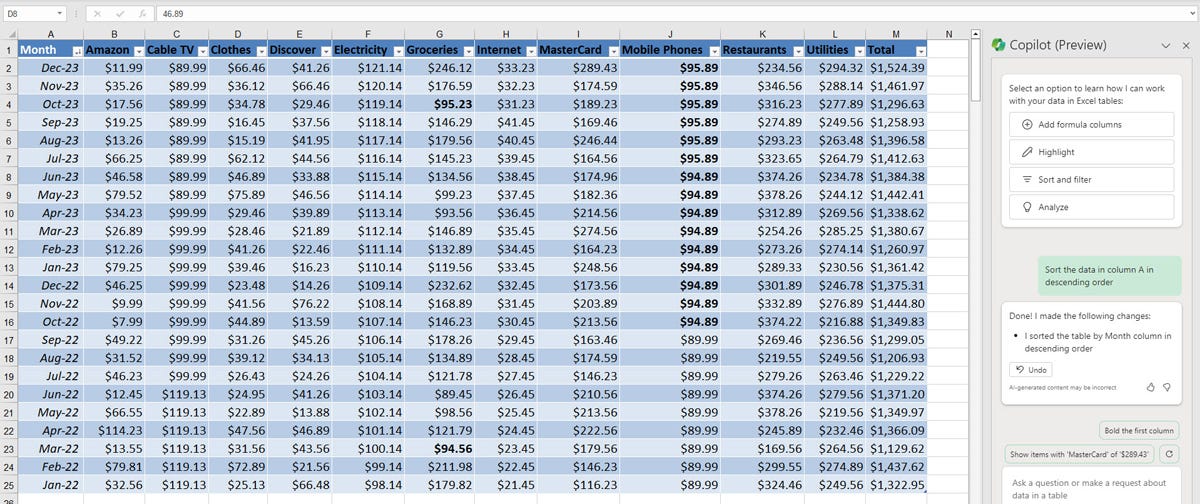
6. Sort data
You can ask Copilot to sort the data in a certain way. Perhaps you want to sort the values of a specific column in descending order?
At the prompt, type: “Sort the data in column A in descending order.” Copilot will then execute your request.
Screenshot by Lance Whitney/ZDNET
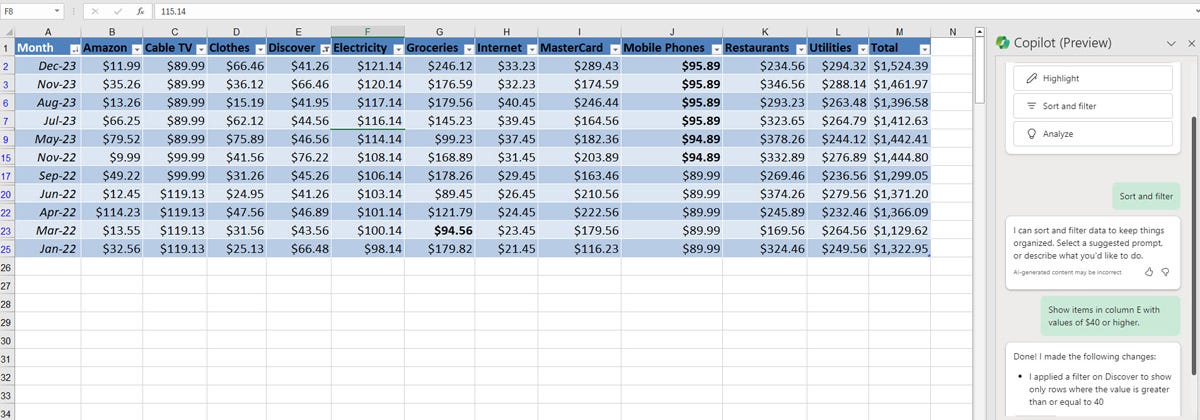
7. Filter data
Then you may want to see only certain data in the table, which you can do by filtering. At the prompt, type something like: “Show items in column E with values equal to or greater than $40”: “Show items in column E with values equal to or greater than $40.”
Copilot will then filter the table to only display values that meet your criteria.
Screenshot by Lance Whitney/ZDNET
8. Analyze the data
Finally, you can analyze the data. Click the Analyze button on the ribbon. Scroll through the sidebar to see the different information already offered by Copilot.
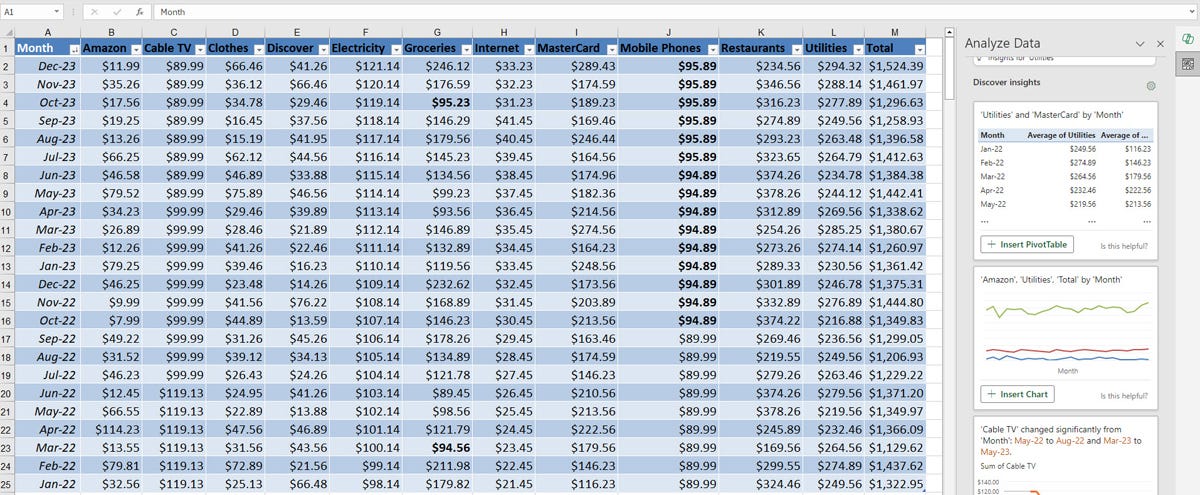
Screenshot by Lance Whitney/ZDNET
Click on one of the proposed queries or enter one yourself. For example, you can ask Copilot to provide information about particular data.
Depending on the data, you can also insert a pivot table or chart to visualize specific values and information:
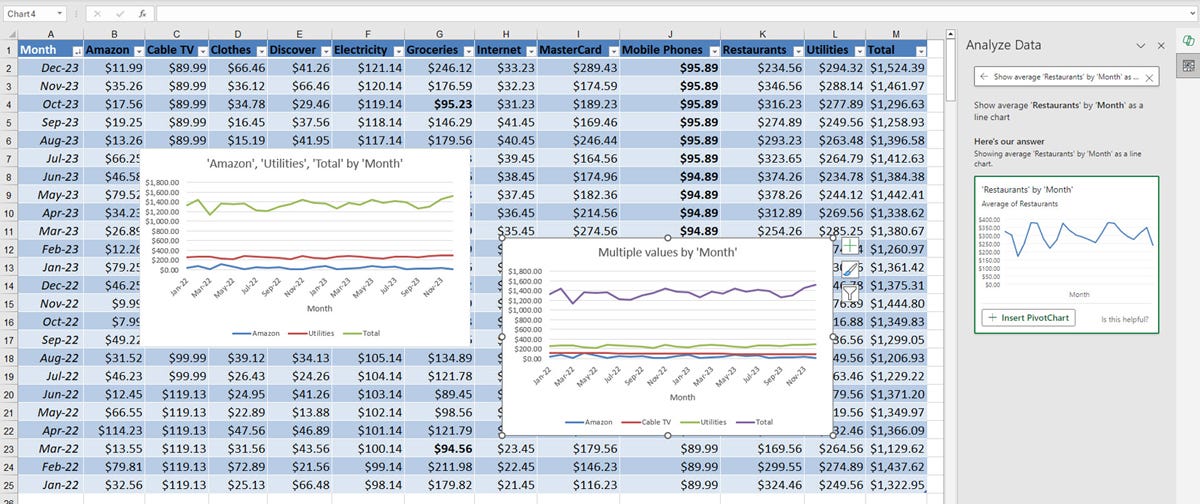
Screenshot by Lance Whitney/ZDNET
Source: “ZDNet.com”