
Take full screen or capture scrolling page on Windows 10
The screenshot features in Windows 10 are highly beneficial, but it’s important to note that there are limitations to each method mentioned. If you require more flexibility and advanced options for your screenshots, it may be necessary to opt for a tool with more powerful features.
Gemoo Snap is a free and dependable tool that allows you to take quick screenshots. It is compatible with Windows and Mac systems. With Gemoo Snap, you can fulfill a variety of screenshot needs, such as providing feedback, enhancing screenshots, taking quick screenshots, capturing screenshots to the clipboard, recognizing text (OCR), capturing scrolling pages, and capturing full pages.
Key Feature of Gemoo Snap
- Allows you to capture a screenshot and add annotations such as brush strokes, text, shapes, numbers, and mosaics.
- Copy the annotated screenshot to the clipboard.
- Select a specific area of the screen to capture without disrupting the current window or page.
- Recognize text in the screenshot and extract or modify it.
- Save the screenshot directly to the cloud or locally.
Taking a screenshot on a Windows 10 PC is as easy as pressing three keys. But from a simple screenshot to GIF capture, do you know all the possible techniques to immortalize your screen? Here’s how to take a screenshot on Windows 10.
Whether natively or by software to be installed, Windows 10 offers several solutions for carrying out screenshots. From a simple screenshot to an animated GIF, here’s how to capture an image of your PC screen on Windows. Note that if you prefer video capture, we also have an explanation for you.
Of course, there is always the option of pressing the “Print” button. Screen” on your keyboard and paste the result into Paint or any other image processing software, but here we offer some more comprehensive features to perfectly master this timeless art of PC screen capture. .
Take a Classic Screenshot on Windows 10 PC
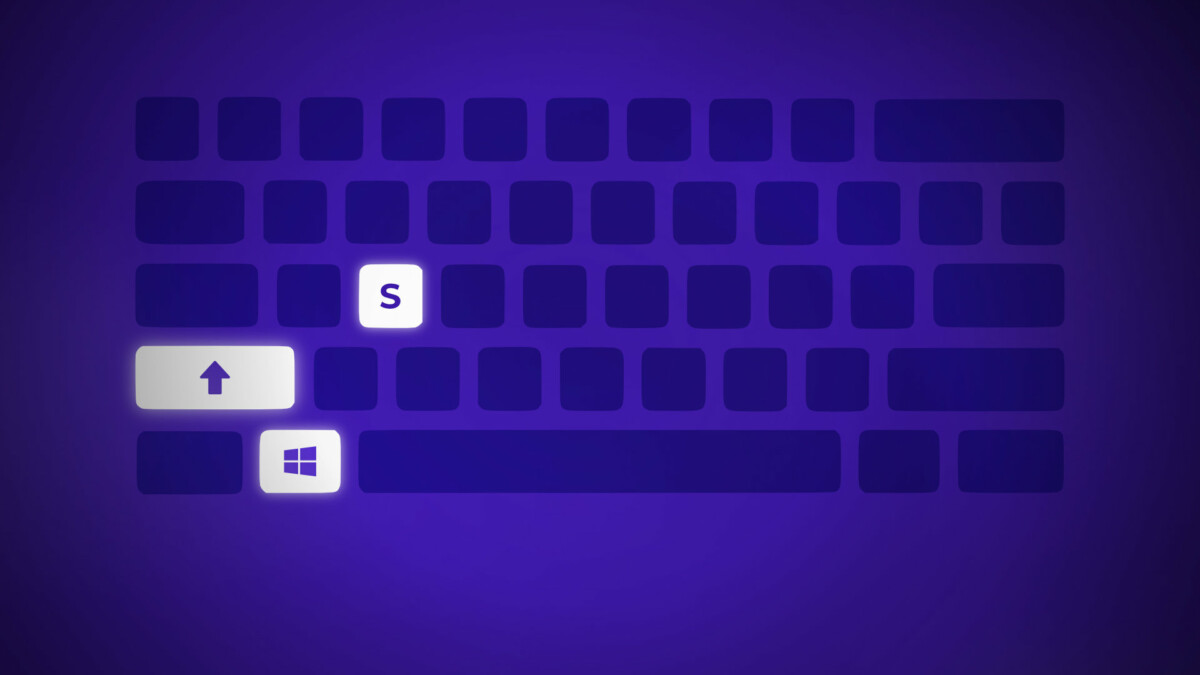
To take a “no frills” screen capture, Windows offers a very effective tool. To launch it, press the keys simultaneously Windows, MAJ (Shift) and S.
The screen then darkens and a small window opens at the top with 4 options:
- Capture part of the screen with a rectangular shape
- Capture part of the screen with a free form
- Capture a window
- Capture whole screen


After taking your screenshot, a notification will appear to offer you to edit and share the image, click on it to open the software ” Screenshot and Sketch“. You can then draw on your screenshot, highlight part of the image, crop it or even measure part of it with a virtual ruler.


Once your modifications have been made, it is possible either to save the screenshot on the computer, either share it through an application or open it in another software, such as Photoshop, Gimp or Affinity to perform more advanced editing.
Take a screenshot with the ShareX tool
If you need more functionality, many screenshot services offer more advanced tools than Microsoft’s. ShareX is one of the best known. This software is open-source and offers the same features as the Windows tool, and more, like recording screen to video or GIF.
You can download it directly from the site dedicated to the software. Once installed, here is how to make a screen recording in GIF via ShareX:
- Open ShareX
- Press the dedicated keyboard shortcut (for a GIF, the default combination is CTRL + SHIFT [Shift] + Print)
- Select the area to capture and left click
- Let the software record
- Press on Stop at the edge of the capture zone
- Go back to ShareX and you will see your GIF waiting for you
The result will depend on your computer architecture. If it is powerful enough, you will be able to get a smooth and quality result. Otherwise, if your PC is a bit old, you may experience some stuttering.
In addition, ShareX offers an automatic sharing system on different storage services clouds such as Dropbox, Google Drive or Imgur, but also on the FTP server of your choice. Just enter your credentials and each time a screenshot is taken with ShareX, it will be uploaded on the services provided. Basically, images are saved in Documents and in the ShareX folder.
Note that this powerful tool offers many options that we will not detail here and we therefore encourage you to delve into the menus to discover everything.
Where are screenshots saved on Windows 10?
If you take a screenshot of Windows 10 with the native tool, the screenshot will be saved in a dedicated folder. So open your PC’s file explorer, then click on Images and then on the aptly named Screenshots folder. Your images automatically go there.
In addition, you should also know that your screenshot is copied to your clipboard. You can therefore copy and paste it into the document of your choice. Finally, note that if you made your screenshot with the ShareX tool presented above, this application lets you configure the location of the folder where to save the images.