
Image: June Wan/ZDNET.
To remember the important events of your day, the thoughts that cross your mind or how you feel at a particular moment, in your personal or professional life, you can keep a journal. But in the 21ste century, no need for a notebook and a pen, your iPhone and the Journal application will do the trick.
The Journal app, available with iOS 17.2, offers suggestions based on your photos, videos, music and podcasts you listen to, and places you visit. You can also just write whatever comes to mind. Among the suggested items, you can select photos and videos from your library, new photos or videos you’ve taken, audio recordings, or specific landmarks and locations. You can write simple text or enrich it with other content, such as photos or audio clips.
You can set your iPhone to remind you to complete your journal at a specific time or day. You can also choose to add content whenever you want. You can also sync your journal to iCloud. Its content will then be protected by end-to-end encryption. You can also add a layer of security to your journal by securing it with authentication with your passcode, Touch ID or Face ID.
1. Update your iPhone
To get started, you’ll need iOS 17.2 or later. To update your iPhone, go to Settings > General > Software Updatethen click Install.

2. Launch the Journal app
Once iOS 17.2 is installed, the Journal app will appear on your home screen. When you first launch the app, it asks if you want to enable suggestions to help you create content. If you would like to take advantage of this feature, click Enable journal suggestions. Otherwise, click Later top right.

3. Add an entry using suggestions
To add content to your journal, look through iPhone’s suggestions—photos, locations, and more—to select what’s meaningful to you. For more suggestions, scroll down the page. You can also click on the tab Recent to view the most recent suggestions.
Beyond suggestions based on your personal data, the application also offers you texts that can make you think or inspire you. Click on the content that interests you to start writing.

Select or deselect the items included in the suggestion you chose, then write what you want in the text box. When you’re done, tap OK. Your content is then added to your journal.

Screenshot by Lance Whitney/ZDNET.
3. Add an entry from scratch
If you prefer to write simply, without relying on suggested content, tap the + located at the bottom of the home screen. Then click on New entry, then write whatever you want. When your text is ready, click OK top right.

Screenshot by Lance Whitney/ZDNET.
Then, if you want to enrich your entry by adding an image or something else, use the toolbar located at the very bottom of the page.
The first icon allows you to choose an item from the suggestions; the second to add a photo or video from your library; the third asks you to take a photo or video which will then be added; the fourth allows you to record and add an audio message; the fifth allows you to specify a location. Once your entry is ready, click OK.

Screenshot by Lance Whitney/ZDNET.
4. Filter your entries
By default, all your journal entries appear on the app’s home screen. To see only certain types of entries, select the three-line icon in the upper left. You can now filter your list of entries by content: photos, audio, reflections, locations, etc.

Screenshot by Lance Whitney/ZDNET.
5. Edit, delete and select your entries
Tap the three dots at the bottom right of an entry. In the menu that appears, you can choose to modify its content by clicking on To modifymark it as a favorite by clicking on Bookmark or delete it by clicking on DELETE.
If you have bookmarked multiple entries in your journal, you can choose to display only those entries by selecting With bookmark in the menu allowing you to filter the entries.

Screenshot by Lance Whitney/ZDNET.
6. Manage your suggestions
To enable or disable suggestions, go to Settings > Privacy & Security > Log Suggestions. In the section Include suggestions for, turn off the items you don’t want to appear in your suggestions between Activity, Media, Contacts, Photos, and Important Places. To remove existing suggestions, you can click Clear history.
By default, the Journal app prioritizes content shared with others, for you and others. If you don’t want your iPhone to use this setting, for privacy reasons, you can turn it off.

7. Configure app settings and permissions
To change the Journal app settings, go to Settings > Log.
Location
Clicking on Position, you can choose to share your location when you use the application or only when sharing or if you have given permission. You can also disable precise location sharing by disabling Exact position.

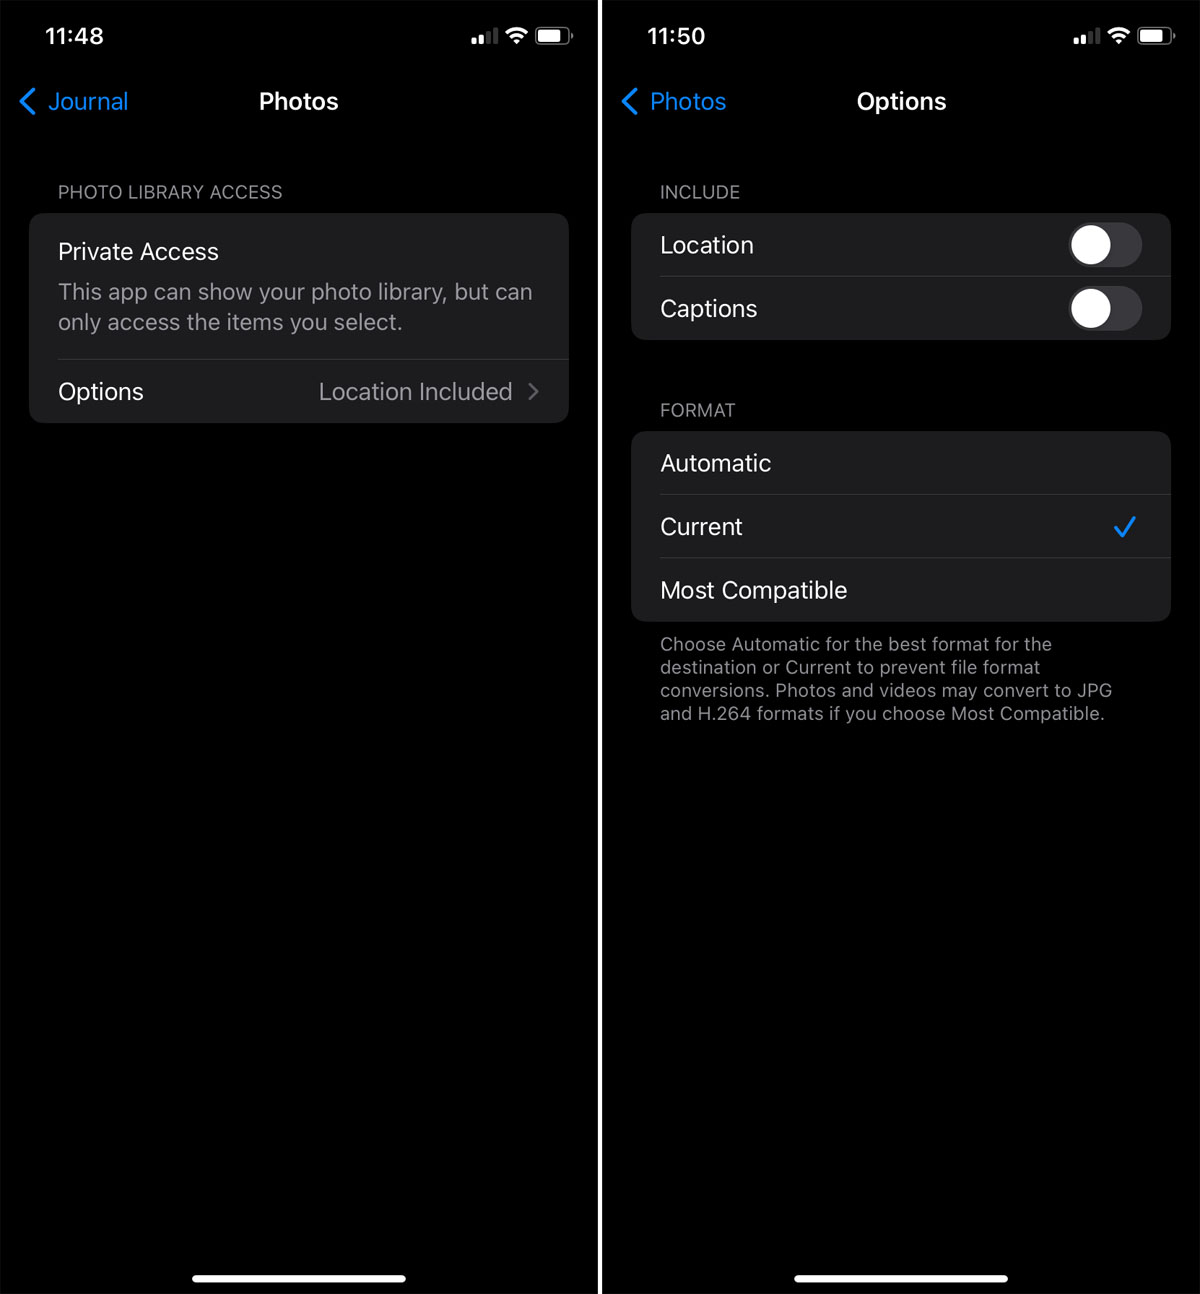
Pictures
Return to the application settings. Go to Photos > Options. Disable Location And Legends if you do not want to include this information in your photos. Below Formatselect the format you want to use for your photos.
Screenshot by Lance Whitney/ZDNET.
Turn off suggestions
If you want to disable suggestions, enable the option Ignore journal suggestions in the section New entry.

Lock your journal
You can choose to lock your journal to secure its contents. To enable this option, click Lock log, enter your access code then activate the option. The next time you open the app, you can choose to unlock your journal using Touch ID or Face ID.

Organize your writing schedule
Go back to the app settings. By going into writing programyou can set reminders for specific days and times.
If you do not want to receive reminders, turn off the option Program.

Source: ZDNet.com