
DNS is the abbreviation of Domain Name Service (domain name service) and this tool is at the heart of our Internet network. DNS makes sure you don’t have to type in an IP address to get where you want to go. Without DNS, instead of typing, say, “Google” into your browser, you would have to remember an address like 142.251.16.100. In other words, DNS makes the Internet more user-friendly. Your desktop, laptop, tablet, and even your phone need DNS to work properly.
Almost everything you do on your connected devices starts with a DNS query. So when you search in your web browser’s address bar or from any app on your mobile device, DNS is working.
The problem is that standard DNS is often insecure, which means that all your queries are sent over the network in the clear.
Why is this a problem? Let’s imagine that you are surfing on a public network (in a coffee shop for example) and you start typing various search queries on your Android device. If someone else is on the same network and has the necessary skills, they could intercept your search queries and know exactly what you are looking for.
This is where private DNS mode comes in handy. Once this feature is enabled, all your DNS queries are encrypted, so bad actors can’t view them (even if they capture the packets). In other words, Private DNS mode should be an absolute must for anyone who values their privacy and security.
But how to enable private DNS mode on Android? It’s actually quite simple.
Required configuration
The only thing you need to enable private DNS mode is an Android device running at least OS version 9.0. Pretty much every modern Android phone is capable of taking advantage of this feature.
Enabling private DNS mode
1. Open Network and Internet
Open the app Settings (from the notification panel or app drawer), then choose Network and Internet. If the menu does not appear, search for “DNS” in the search bar.
2. Enable Private DNS.
You will find the menu Private DNS at the bottom of the list.
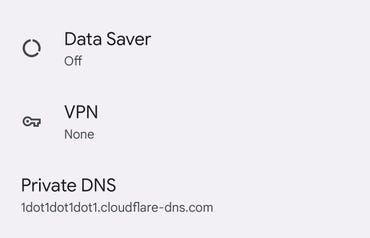
Image: Jack Wallen
3. Add a provider that offers secure DNS
This is where things get a little tricky. You should have the address of a provider that offers private DNS available. One such provider is Cloudflare, and its private DNS server address is: 1dot1dot1dot1dot1.cloudflare-dns.com
Other private DNS also exist:
-
Google-DNS : dns.google -
Quad9 : dns.quad9.net -
Cleanbrowsing DNS : security-filter-dns.cleanbrowsing.org
When you tap on Private DNS, a new pop-up will appear. Press on Private DNS provider hostnamethen type the name you want.
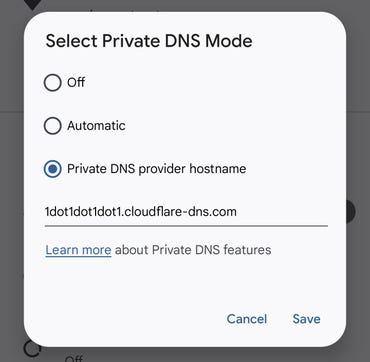
Image: Jack Wallen
Press on To register to save the new setting and close the Settings app.
That’s all there is to it. Once you have enabled Private DNS on Android, you can be sure that all your DNS queries will be encrypted. Take advantage of this increased privacy and security.
Source: “ZDNet.com”