
We always get a lot of feedback from readers on our c’t building proposals. For a better overview, we have put together and answered the most frequently asked questions for you in an FAQ.
Power LED does not light up
I assembled the Ryzen all-rounder according to c’t specifications and made the BIOS settings as recommended. However, when I switch on the computer, the LEDs for power and SSD remain dark.
You are right, we have optimized the settings for maximum energy savings. To switch on the status LEDs, you just have to open the Aura menu in the BIOS setup using F4 and change the setting from “Stealth Mode” to “Aura Off”. Save and then exit the BIOS setup with F10.


BIOS update fails
I am not able to load the BIOS of the Asus mainboard into the Ryzen all-rounder via flashback. The LED flashes, but then the computer still does not start.
This can have several reasons. First you should check whether you have exactly the right BIOS file for the board. The BIOS linked by us on the project page only works with the Asus “TUF Gaming B550-Plus (Wi-Fi)”. It is particularly important that the part numbers match 90MB15D0-M0EAY0. You can find it on the board package on the white sticker with the barcode.
If the update still does not work, you should see whether you have installed the mainboard correctly. In some cases, readers have reported to us that the ATX cover was not positioned correctly and that the button for the BIOS flashback was pressed permanently. This can also happen if the board is attached with the wrong screws. The screws with the coarse thread and the round head are correct.
If this is not the case, there may also be a problem with the USB stick. This must be FAT32 formatted and the CAP file must be named TGB550PW.CAP. The Asus zip file contains the Windows tool BIOSRenamer, which changes the name of the CAP file with a click of the mouse.
If the computer still does not start, you should reset the BIOS using CMOS-Clear. To do this, you have to switch off the Ryzen all-rounder, pull out the power plug and open the housing. Now use a screwdriver to short-circuit the two pins of the CLRTC connector on the lower edge of the mainboard. Now the Ryzen all-rounder should boot with the current BIOS.
Quad-core for the Ryzen all-rounder
I would like to save some money because I only run simple office applications anyway and would therefore like to install a quad-core processor. Which does c’t recommend?
Unfortunately, we cannot give you a tip because AMD does not currently offer a processor in this price segment. Only large PC manufacturers get the four-core Ryzen 3 5300G with the latest Zen 3 architecture, which is why it is not available in retail outlets. The same applies to the predecessor Ryzen 3 4300G with Zen 2 technology. We advise against the outdated Ryzen 3 3200G and Ryzen 5 3400G, which some dealers still have in stock, because their Zen + technology does not work efficiently.
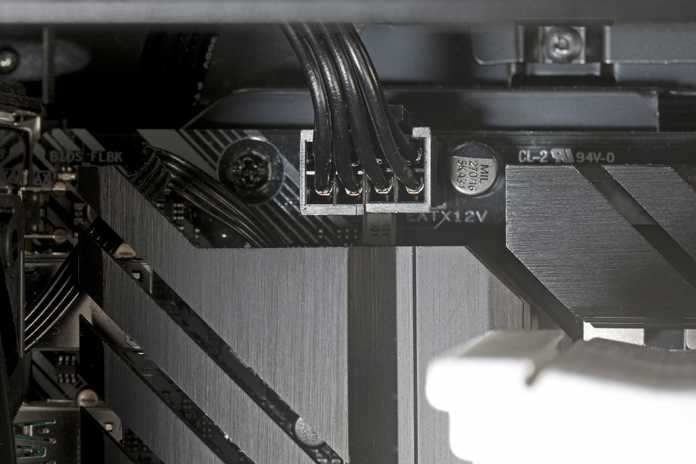
The Ryzen all-rounder cannot boot without a connected ATX12V connector. Because it is in the hardest-to-reach place in the whole PC, this lapse is often not noticeable after assembly.
Trip hazard ATX12V connector
The computer is now fully assembled in front of me. After switching on, the fans rotate, but there is no picture.
You have probably forgotten to connect the eight-pin ATX12V plug from the power supply unit to the associated connection on the mainboard. Unfortunately, this is in the hardest-to-reach place on the PC in the upper left corner of the board, where it is largely covered by the CPU cooler. If you have difficulties to reach this, you have to temporarily detach the board from the case to connect the ATX12V cable.
Better 3D performance with integrated graphics
With the integrated GPU of the Ryzen all-rounder, the role-playing game Divinity 2 only offers me the lowest graphics quality to choose from. Is there a solution for this?
Some 3D games cannot cope with the dynamic memory allocation of integrated graphics units. By default, the Radeon GPU of the Ryzen 5 5600G only takes up 512 MB of RAM. If a 3D game requires more graphics memory, it usually automatically runs out of more main memory. If this does not work, you can set the amount of RAM reserved exclusively for the GPU yourself in the BIOS setup under Advanced / NB Configuration / UMA Frame Buffer Size.
You have to try out which value is sufficient for the 3D game to allow higher quality levels. Simply setting the value to a maximum of 8 GB has a serious disadvantage. Because then this memory is permanently blocked for the operating system and applications, so that only half of the 16 GByte of our construction proposal can be used as main memory. We therefore recommend starting with 1 or 2 GB.
In addition, it can be advantageous for some titles to activate the Smart Access Memory. This technique improves the GPU’s memory access. To switch it on, you have to activate the option “Above 4G Decoding” in the BIOS setup under Advanced / PCI Subsystem Setting. Then “Resize BAR Support” appears as a new option, which you set to “Auto”.
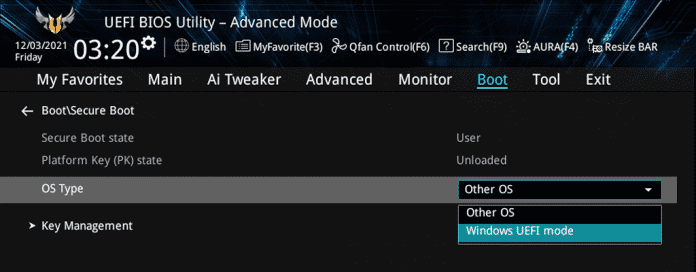
The switch for UEFI Secure Boot can be found in Asus’ BIOS setup in a somewhat cryptic way behind the selection of the operating system. If you want it to be active, you must select “Windows UEFI mode”, even if you are installing a Linux distribution.
BIOS settings for Windows 11
How do I set the BIOS setup of the building suggestions so that the computers are Windows 11 compatible?
We recommend installing the latest BIOS update for both the Ryzen all-rounder and the iDeskMini. The board manufacturers Asus and Asrock have already made the correct default settings there.
If you want to check this: On the AM4 mainboard of the Ryzen all-rounder Asus TUF Gaming B550 Plus WiFi, “Enable Firmware TPM” of the Ryzen processor must be selected under Advanced / AMD fTPM configuration / TPM Device Selection. With the Asrock DeskMini H470, the option is Advanced / Trusted Computing / Security Device Support, which must be set to “Enable”.
Furthermore, the default of Windows 11 is that the system boots in UEFI mode. Go to the Asus board in the BIOS setup menu item Boot / CSM (Compatibility Support Module) and check there that Launch CSM is set to “Disabled”. At Asrock you will find the option under almost the same path Boot / CSM (Compatibity Support Module) / CSM, which should also have the status “Disabled”.
UEFI Secure Boot is not a requirement for Windows 11; only the option for this must be available. If you want to switch it on, you have to change the OS type of the Ryzen all-rounder under Boot / Secure Boot from “Other OS” to “Windows UEFI Mode”. Asrock activates Secure Boot by default on the iDeskMini. You can check this under Security / Secure Boot / Secure Boot “Enabled”.
Bad hardware availability
There are sold out components every year after our building proposals have been presented, because the demand for hardware is always particularly high in the run-up to Christmas. In 2021, the delivery situation was even more tense due to the lack of chips that had been going on for years and the logistics chains disrupted by the pandemic.
This affects the mainboard Asus TUF Gaming B550-Plus (WiFi) of the Ryzen all-rounder and the PC barebone ASRock DeskMini H470 of the compact PC iDeskMini. We can only ask for your patience. The manufacturers have promised us new deliveries, but container freight doesn’t just move quickly from Asia to Europe, it takes four to eight weeks. Therefore, the boards will probably only be better available again at the beginning of 2022.
The Asrock DeskMini H470 was sold out just a few days after our building proposals appeared.

In c’t 2/2022 we have put together the c’t Emergency Windows 2022 for you. With the kit for the system running from the USB stick, you can find viruses, save data or reset passwords. We shed light on how the EU wants to use loopholes of the GDPR for content scanners, we tested high-end smartphones, mobile USB-C monitors and server software for private media collection. Issue 2/2022 is available from December 31st in the Heise shop and at the well-stocked magazine kiosk.
(chh)