
Social media is both a bane and a blessing. It’s one of the things in their daily lives that people really want to stop but can’t. And even when a particular service is taken over by a certain billionaire and the quality of the service goes down, people say they want to get away from it, but they can’t.
Meanwhile, Mastodon continues on its way, recovering escaped Twitter and Facebook users. I recently joined Fosstodon, a Mastodon server dedicated to open source. Of course, it’s not just about open source, but that’s at least the main focus. The time spent on Fosstodon was much more profitable than the time spent on Twitter (more than ten years). Everyone is pleasant and encouraging, and even when users have a different opinion from mine, our exchanges are polite.
What change !
For some, Mastodon can be a challenge. You need to find a server you’re interested in (or just a general server), apply for a free account, wait to be accepted, then learn the ins and outs of the interface (which should be pretty familiar to most people when even).
But if you’re like me, maybe you already have lots of tabs open in your browser and that can sometimes be overkill. That’s why, whenever possible, I opt to use a client app to separate it from the interaction of my overly cluttered web browser. On Linux, I use Tuba. Under MacOS, I use Mastonaut.
Mastonaut is a free Mastodon client that offers a user interface that makes interacting with Mastodon a real pleasure. With this free Mastodon client, you can browse, follow, interact and contribute to the community of your choice without having to open a new browser tab.
The features of Mastonaut are as follows:
- Easy to use interface.
- Editor with drag and drop to add images.
- Keyboard navigation.
- Support for polls.
- Emoji support.
- Column-based layout.
- Support for multiple accounts.
- Full support for media and content warnings.
- Support for annotated media.
- Research.
- Delete and rewrite.
- Notifications.
- Sharing from other macOS applications.
- Bookmarks.
- Editing the account.
Mastonaut is free and can be easily installed from the Apple App Store with just a click of the mouse. One of my favorite features in Mastonaut is the ability to quickly change the display of each column. In the left pane, you can switch between Welcome, Local timeline Or Public timelineand in the right pane you can choose between Local timeline, Public timeline Or Notifications. It is also possible to add additional panes. In general, I keep Welcome in the left pane and Notifications in the one on the right. Thanks to this layout, it is very easy to see the two panes, which update automatically.
Here’s how to get started with this software.
How to use Mastonaut
The only thing you will need it is to install Mastonaut on a compatible device, therefore operating under MacOS. As I mentioned earlier, you can install Mastonaut from the Apple App Store.
1. Add a Mastodon server to Mastonaut
Once Mastonaut is installed, you must add a server. Before that, you will need to apply for a free account on your server of choice and be approved (if your server of choice requires account approval). Once approved, open Mastonaut.
In the initial window, you will be prompted to log in. After logging in, a pop-up window will appear, where you can either type in the address of the Mastodon server you joined, or select one of the most common instances. Enter the address of the Mastodon server for which you have an account and validate. Your default web browser will open, asking you to log in to your Mastodon account and allow access to the app.
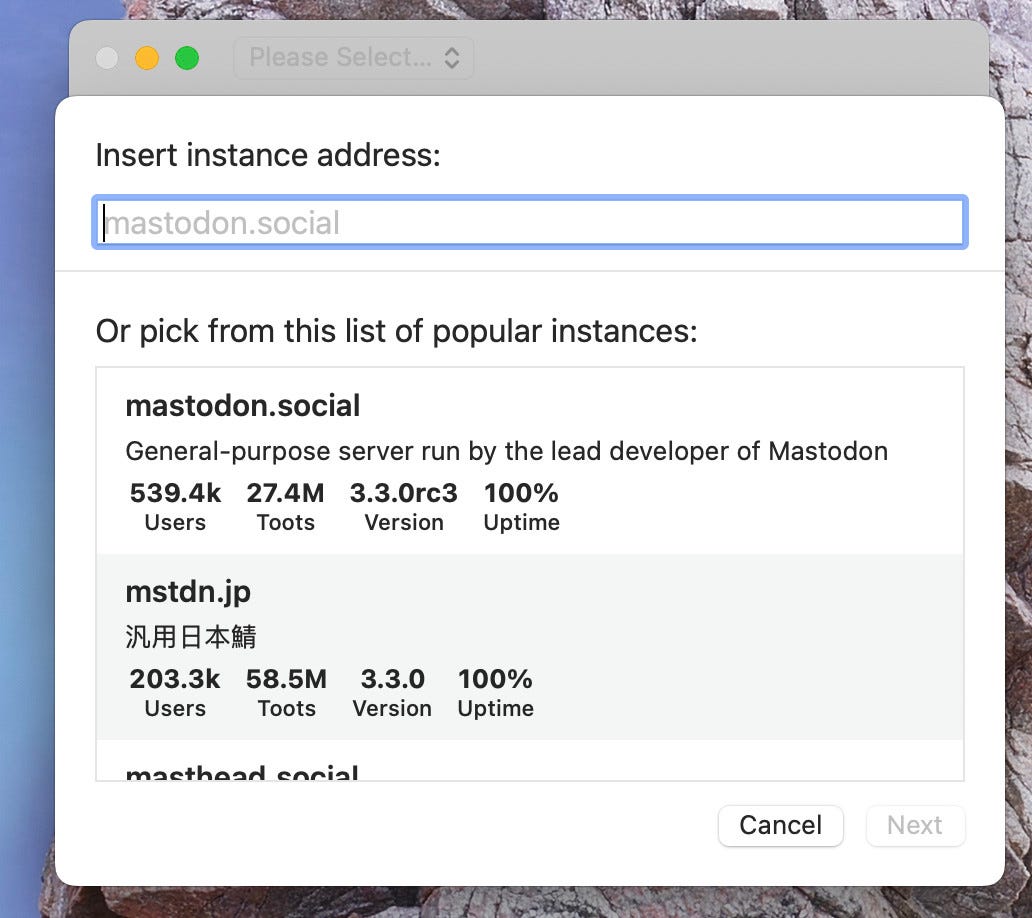
Addition of a new account to Mastonaut. Screenshot by Jack Wallen/ZDNET
2. Add panes
When Mastonaut first opens, you will only see one pane defined as Welcome. You will probably want to add a second pane. To do this, click on the rightmost icon in the upper right corner of the window and select Local timeline, Public timeline Or Notifications. Once the second component is added, everything falls into place. You can view the pane Welcome to see, display and interact with the latest “pouets” (or “toots” in English”).
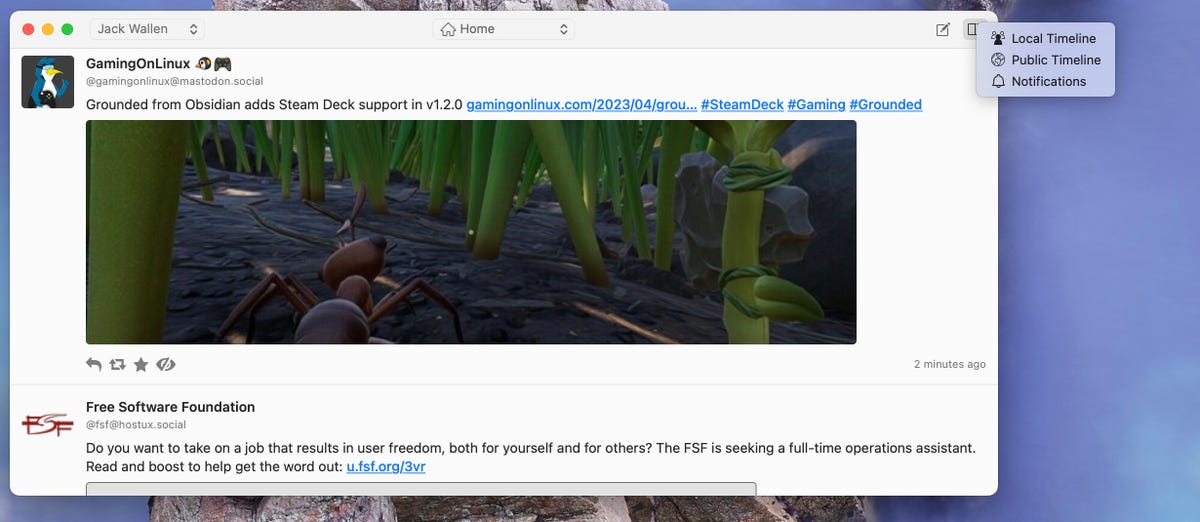
Added a new pane to Mastonaut. Screenshot by Jack Wallen/ZDNET
3. How to make a “squeaker”
Unlike Twitter, on Mastodon, you make a “squeak”. To do this, click the left icon in the upper right corner of the Mastonaut window to open the compose window, where you can type up to 500 characters, add attachments, add content disclaimers (in clicking on CW, for “Content warnings”), add polls and open the emoji picker. You can also choose to send a public, unlisted, subscribers only, or direct message. Once you’ve composed your message, click “Send Toot” and you’re done.
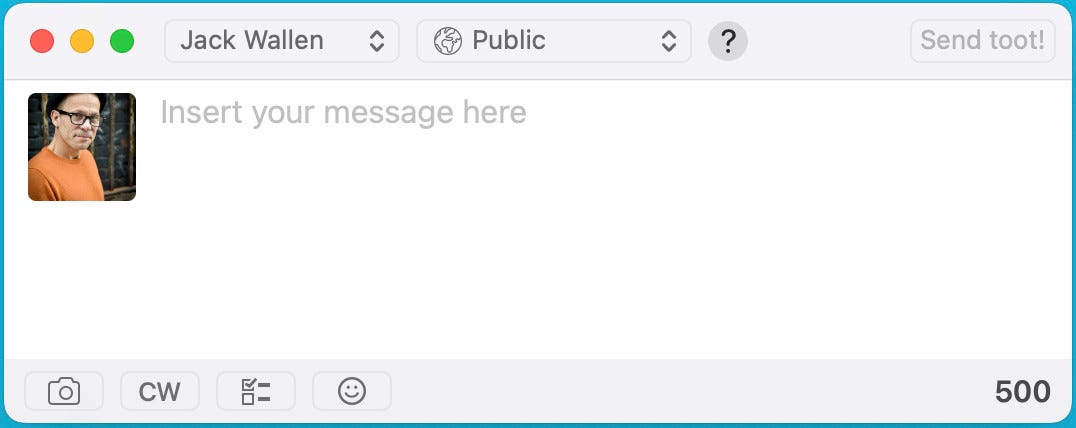
Making a squeak with Mastonaut is very simple. Screenshot by Jack Wallen/ZDNET
That’s about all you need to know to use Mastonaut. This remarkable MacOS client will allow you to interact with the Mastodon server(s) of your choice. You can add more than one account later.
If you’re like me and you don’t care about Twitter and Facebook, Mastodon is a great option and Mastonaut is a fantastic client.
Source: “ZDNet.com”